In order to search through a hard drive faster, XP keeps a record of all files on the hard drive.
It sounds useful, but if you use Windows search tool infrequently, the indexing service just constantly runs in the background without being taken advantage of and used.
Indexing can slow down actions as simple as opening or closing files.
To disable this service:
1)go to Start > Run and type services.msc.
2)Double click Indexing Services and set the startup type to Disabled.
3)If you want to search, there is a freeware program called Locate that can index 400GB of data in under 2 minutes and can perform instant searches.
4)File > Update Databases re-indexes all your drives, in case you miss where the indexing option is located. You should only re-index before a search. This way, system resources are used only when you actually need to perform a search.
In addition, you can use Task Scheduler (a.k.a. Scheduled Tasks) to run the shortcut named Updtdb32″ in place of using the Update Database option manually within the program. For example, have the task run daily at a time you are not usually at your computer, such as early in the morning. So, all the files that had been added, moved and changed from the previous day can be indexed. If you have this re-indexing task done daily, it only takes a few seconds each time it is done. You can get to the task scheduler by
going to Start > Run.
Type %systemroot%\Tasks, and hit enter.
Double click on Add Scheduled Task and the wizard will help take you through the process of setting up a scheduled task.
Make sure you hit Browse when asked for what application you want to be run. Navigate to the folder where you have the Updtdb32″ shortcut.
Other than that, creating the scheduled task should be fairly self-explanatory, thanks to the wizard.
_________________
December 15, 2008


Change owner and organization in System Properties
If you want to change the owner and organization in System Properties, just do the following:
Open the registry and go to HKEY_LOCAL_MACHINE\SOFTWARE\Microsoft\Windows NT\CurrentVersion
Now just change the value for RegisteredOwner and RegisteredOrganization
Open the registry and go to HKEY_LOCAL_MACHINE\SOFTWARE\Microsoft\Windows NT\CurrentVersion
Now just change the value for RegisteredOwner and RegisteredOrganization
Associate an icon with a drive
To set the icon of any drive (hard disk, cd rom or anything else) with a letter (C:\ etc.), run REGEDIT (Start -> Run -> regedit)
Navigate to:
HKEY_LOCAL_MACHINE\SOFTWARE\Microsoft\Windows\CurrentVersion\Explorer
If one doesn't already exist, create a new KEY called "DriveIcons". Under this key, create a new key with the letter of your drive.
I.e. C for your C:\ drive.
To change the icon for that drive, create a key inside that one called DefaultIcon and set the path of (Default) to the location of your icon
eg C\DefaultIcon\
then (Default) = D:\Documents\C Drive Icon.ico
To change the name of that drive, create a key in the drive letter one (eg C\) called DefaultLabel and set the (Default) to what you want the drive to be called.
This is useful if you want to assign a long name to the floppy drive.
Navigate to:
HKEY_LOCAL_MACHINE\SOFTWARE\Microsoft\Windows\CurrentVersion\Explorer
If one doesn't already exist, create a new KEY called "DriveIcons". Under this key, create a new key with the letter of your drive.
I.e. C for your C:\ drive.
To change the icon for that drive, create a key inside that one called DefaultIcon and set the path of (Default) to the location of your icon
eg C\DefaultIcon\
then (Default) = D:\Documents\C Drive Icon.ico
To change the name of that drive, create a key in the drive letter one (eg C\) called DefaultLabel and set the (Default) to what you want the drive to be called.
This is useful if you want to assign a long name to the floppy drive.
October 25, 2008


October 13, 2008
Faster Start-Up Of Windows XP
If your computer takes a long time to become useable after starting up or logging on, or you want a clean boot of Winodws XP try this,
Click Start > Run > Type “msconfig” >
On the Startup tab click Disable All and on the Services tab check the Hide All Microsoft Service box and then click Disable All.
Click Restart and Windows XP will restart with only the system services and applications running resulting in a vey fast logon / startup.
*******
N.B This tweak will disable all non-system startup sevices and applications,
so if you have anything you want to run in the background such as anti virus software do not disable that item.
Click Start > Run > Type “msconfig” >
On the Startup tab click Disable All and on the Services tab check the Hide All Microsoft Service box and then click Disable All.
Click Restart and Windows XP will restart with only the system services and applications running resulting in a vey fast logon / startup.
*******
N.B This tweak will disable all non-system startup sevices and applications,
so if you have anything you want to run in the background such as anti virus software do not disable that item.
Increase XP performance
The default Windows XP visuals look pretty but they do nothing for system speed; in fact some of them can slow your PC down quite noticeably.
Not all of the fancy fripperies are bad, though, and you can still keep the XP look and feel without sacrificing too much performance.
Here’s how, go to Start > Control Panel > System, select the Advanced tab then click the Settings button under Performance. For the best compromise between speed and appearance uncheck everything except:
- Show shadows under menus
- Show shadows under mouse pointer
- Show translucent selection rectangle
- Use drop shadows for icons labels on the desktop
- Use visual styles on windows and buttons
Click Apply and OK to exit the dialogue box and your new visual settings will be applied.
Not all of the fancy fripperies are bad, though, and you can still keep the XP look and feel without sacrificing too much performance.
Here’s how, go to Start > Control Panel > System, select the Advanced tab then click the Settings button under Performance. For the best compromise between speed and appearance uncheck everything except:
- Show shadows under menus
- Show shadows under mouse pointer
- Show translucent selection rectangle
- Use drop shadows for icons labels on the desktop
- Use visual styles on windows and buttons
Click Apply and OK to exit the dialogue box and your new visual settings will be applied.
Modify Windows XP System Properties Logo
The Windows XP System Properties logo is often changed by computer manufacturers. Hardware vendors use this general system information dialog to brand your computer with their own logo and support contact information.
In this tip you can learn how you can insert your own logo in the system properties dialog and complete it with your own contact information.
To invoke the system properties dialog, click the Start button, right-click “My Computer” and select “Properties”.
This will open up your general system information dialog. On our Fujitsu-Siemens Amilo Pro laptop, the Windows XP System Properties logo looks like this :
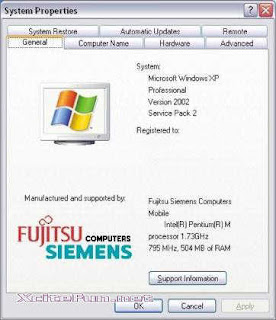
If you want to put your own graphic in there, you should create your image in a .bmp graphic file. It’s also a good idea to create this bitmap image with the same background shade of gray (RGB: 192, 192, 192) used in the Properties dialog. Otherwise, you risk letting Windows make its own judgments regarding color contrast and background shading.
The next thing to consider is the image size. The system properties dialog only offers enough real estate for an image of about 180 (wide) x120 (high) pixels. Make sure that you can fit your logo in this area.
Once you have created your logo and saved it as a .bmp file, copy it over to the system32 subfolder of your Windows system folder. If you don’t know where your system folder is :
- Click the Start button and select “Run”
- In the “open” field, enter “cmd” (without the quotes) and click ok
- Windows will open up a dos command window
- In the command window, type “set system” (without the quotes)
- Look for the line that contains “SystemRoot”, this is where your system directory is (generally, the Windows XP system folder is c:\windows)
Now that you know where your system folder is, copy your logo image file over to the system32 subfolder of your system folder. Then rename your logo image file to oemlogo.bmp
Additionally you can create a new file in this same folder and name the new file oeminfo.ini
In this file you can enter your contact information like in the example below :
[General]
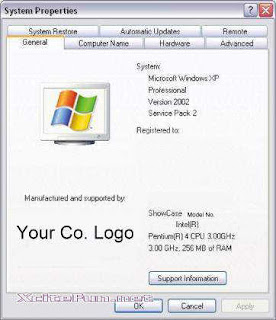
Manufacturer=Your Company Name
Model=ShowCase
[Support Information]
Line1=” ”
Line2=” For support, sales, upgrades or questions:”
Line3=”"
Line4=” Some text to demonstrate the XP System Properties logo”
Line5=” Windows XP PC ”
Line6=” Your Company Name”
Line7=”"
Line8=” +1 (888) 888-888 (voice)”
Line9=” +1 (888) 888-889 (fax)”
Line10=”"
Line11=”"
Line12=” http://www.Your Company Name.com/”
Save and close the file and you are ready. From now on, if someone opens up the system properties dialog, your own Windows XP System Properties logo is in there.
In this tip you can learn how you can insert your own logo in the system properties dialog and complete it with your own contact information.
To invoke the system properties dialog, click the Start button, right-click “My Computer” and select “Properties”.
This will open up your general system information dialog. On our Fujitsu-Siemens Amilo Pro laptop, the Windows XP System Properties logo looks like this :

If you want to put your own graphic in there, you should create your image in a .bmp graphic file. It’s also a good idea to create this bitmap image with the same background shade of gray (RGB: 192, 192, 192) used in the Properties dialog. Otherwise, you risk letting Windows make its own judgments regarding color contrast and background shading.
The next thing to consider is the image size. The system properties dialog only offers enough real estate for an image of about 180 (wide) x120 (high) pixels. Make sure that you can fit your logo in this area.
Once you have created your logo and saved it as a .bmp file, copy it over to the system32 subfolder of your Windows system folder. If you don’t know where your system folder is :
- Click the Start button and select “Run”
- In the “open” field, enter “cmd” (without the quotes) and click ok
- Windows will open up a dos command window
- In the command window, type “set system” (without the quotes)
- Look for the line that contains “SystemRoot”, this is where your system directory is (generally, the Windows XP system folder is c:\windows)
Now that you know where your system folder is, copy your logo image file over to the system32 subfolder of your system folder. Then rename your logo image file to oemlogo.bmp
Additionally you can create a new file in this same folder and name the new file oeminfo.ini
In this file you can enter your contact information like in the example below :
[General]
Manufacturer=Your Company Name
Model=ShowCase
[Support Information]
Line1=” ”
Line2=” For support, sales, upgrades or questions:”
Line3=”"
Line4=” Some text to demonstrate the XP System Properties logo”
Line5=” Windows XP PC ”
Line6=” Your Company Name”
Line7=”"
Line8=” +1 (888) 888-888 (voice)”
Line9=” +1 (888) 888-889 (fax)”
Line10=”"
Line11=”"
Line12=” http://www.Your Company Name.com/”
Save and close the file and you are ready. From now on, if someone opens up the system properties dialog, your own Windows XP System Properties logo is in there.

Subscribe to:
Posts (Atom)
ur ip info:

Sign by Dealighted - Coupon Codes and Deals


 Posts
Posts


